Inside Gardens

Indoor garden plantersI’ve always enjoyed gardening. Nothing too fancy, a few flowers, herbs, and the occasional tomato or pepper plant. This is a tradition that was passed down to me by my mother. I remember her planting a classic Italian garden of plum tomatoes, basil, and green peppers in the postage stamp strip of grass in back of her home in Flushing, New York.

She would dutifully tend to it every morning during the spring and summer months and the produce she’d somehow manage to coax from it was nothing short of astonishing! There was always fresh Italian tomatoes for salads or to put on sandwiches and just enough to make a small batch of fresh sauce which was seasoned by an abundance of fresh basil.

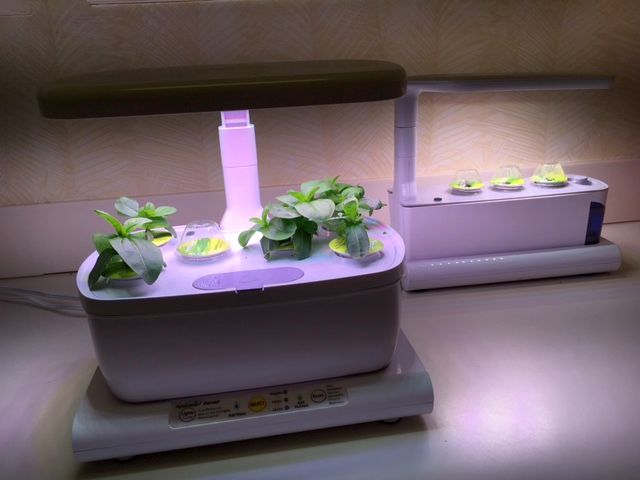
These days, I don’t have much of a yard for planting or the desire to spend much time out in the intense South Florida heat. That’s why I was so excited to discover the Aerogarden! I purchased mine online, but you can also find them in the big box retail stores like Costco and Walmart. They’re manufactured by Mircale-Gro, the company that makes plant fertilizer.

indoor herb gardensI started out planting herbs: basil, oregano, and Italian parsley. All ready for pizza! They were really easy to set up and the only tricky thing is figuring out the timers. I think the main problem will always be in the timer that controls when the grow light turns on and off. They should be on 14 or 18 hours and off 8 or 6 hours.

Since I go to bed early, I have to rely on my husband, George, to tell me what time the lights went off. That’s fun because he’ll say, “I think they went off at 11 or maybe it was 10 or 10:30.” One of the Aerogardens has a timer that is going off and on at crazy times. I wrote to the company about it and they replaced free of charge with no additional shipping charge.

When there is an inch growth under the domes, you remove the domes and adjust the height of the lights as the plants grow. It’s so much fun to watch the growth and of course, harvesting the fruits of your labor. In fact, everything is growing so rapidly that I can’t keep up with it. Since the growth is so full, the garden needs water every day, even sometimes twice a day. At this point, I could probably use an interior plant maintenance company to come in on a regular basis and take care of my gardens for me!

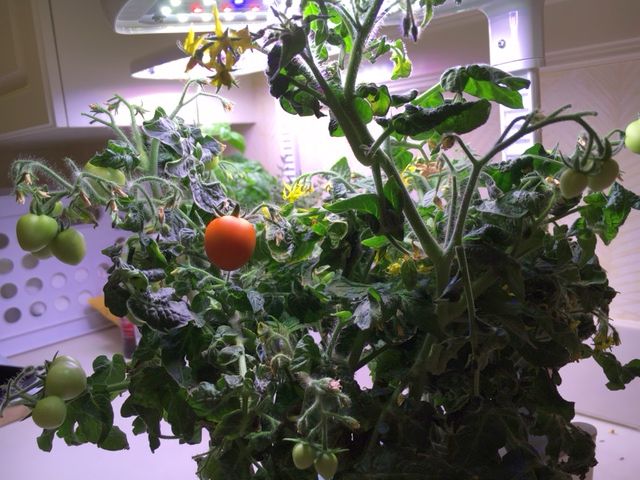
I even planted some tomatoes which you can see in the photo below. They were delicious, but very small and I wound up removing them.

inside tomatoes


I had some extra herb pods leftover so I planted those in its place (dill, savory, and Genovese basil). That was in the three pod planter. As for the six pod garden, it has gotten so overgrown that I can’t keep up with it. I have so much basil frozen and now I’m even trying to freeze the coriander. I think I might remove all six and just plant flowers and then I would have some pretty flowers on my utility room counter.

I never thought I would have such prolific growth! Coriander is so hard to keep when you buy it in the grocery store and I didn’t expect that it would grow as fully as basil. It’s so fresh tasting and goes great in eggs and salsa or any Mexican dish.

I planted flowers (zinnias) in my larger aerogarden as I couldn’t keep up with the herbs. I could open a herb shop! In my smaller garden I started a new herb growth, basil, oregano, and parsley. I’m sure I’ll end up putting flowers in that one also. Whenever we have company they go right to my Aerogarden. It’s such a big attraction!

Secret to Crack-Free Cheesecake

Prevent Cheesecake CrackingAfter much debate and discussion, trial and error, as well as a few tears shed, I believe, with the suggestions received from very helpful readers, I have found the answer to baking a crack-free cheesecake. I’ve tried the hot water bath method with mixed results and quite frankly I don’t think it’s worth the extra effort. One of the suggestions sent to me worked quite well and I feel it is the answer to avoiding cracking during the cooling period in the oven:
  1. Once the cheesecake is fully cooked (toothpick inserted in center comes out clean), turn off the oven
  2. Slide the oven rack out so you can easily reach the cake
  3. With a spatula carefully slide around rim of pan to loosen the cake from rim
  4. Slide the rack back in oven, close the oven door, and let the cake cool for one hour before removing
By releasing the edges of the cake from the inside of the springform pan, the cake is then free to contract and is much less likely to crack in the process.

Fluffy Cheesecake Using a Water Bath

Cheesecake Water Bath“To water bath or not to water bath, that is the question”

Some of my readers who baked my fluffy cheesecake using all the helpful suggestions have written to tell me that they had some problems while baking. The problem was usually the same one for all; they encountered cracking at the end of baking and during the cool down cycle. Well, I have also experienced that problem with either a small crack in the middle or several around the edges but never cracking completely through the cake.

When Aunt Mary passed down this family recipe to me, she did tell me that cracking can happen and it’s something that never concerned her. Being the Martha Stewart of her day, she would say, “Just top it with powdered sugar or make a nice fruit glaze to cover the top”.  Thus, that is what I have done. The cracking doesn’t happen all the time but it can occur and I have tried to see how we bakers can avoid this problem. There are some helpful suggestions posted at the end of the original post on Fluffy Cheesecake so make sure to always read those before starting:

Cheesecake Post Comments

I have also done some research on water baths for baking methods and many chefs use a water bath when baking cheesecakes. However, none of their recipes were similar to mine so I was leery of trying the water bath method especially after one of my young cooks (age 10-13 competition) baked my cheesecake recipe and won first place in a baking contest. And she didn’t use a water bath but just followed my instructions carefully!

Today I was determined to try the water bath method on my original recipe. I did not want to fuss with the foil method, so I devised an easier technique than the one in the link below:

Cheesecake Baking Steps

My Cheesecake Water Bath Method:

After preheating to a 320 degree oven, I placed a 9×6 loaf pan on the same rack I would use to bake the cheesecake. I boiled 4 cups of water and after placing the prepared cheesecake in the oven; I carefully filled the loaf pan with the hot water, closed the oven door and set the timer for 1 hour. It was completely cooked after 1 hour and I turned off the oven for another 1 hour, and remember DON’T OPEN THE OVEN DOOR. Follow the directions for cooling down in the original recipe.

PERFECTION, NO CRACKS!!

Aunt Mary would be very pleased with the final results and my using a water bath. Thanks again Aunt Mary for a fabulous recipe and good baking to all of you and enjoy a marvelous, fluffy cheesecake!

Pumpkin Cheesecake Recipe

Pumpking Cheesecake RecipeNovember has arrived, which means the holidays are just around the corner! If you are like me, you probably are planning menus for those special dinners and are looking for some classic recipes. One classic recipe for the holidays is Pumpkin Pie, a tradition in many families.

However, coming from an Italian-American family we were not familiar with pumpkin pie for dessert. More likely we would serve pastries, cheesecake or cannoli. So when many of my readers asked for a pumpkin cheesecake recipe using my original Aunt Mary cheesecake formula, I was stuck.

When George and I moved to Texas, we became familiar with pumpkin pie (George’s favorite) and learned from native Houstonians how to make a perfect pie. Not until a few years ago has pumpkin been introduced into cheesecake.

I have tried a few pumpkin cheesecakes in various restaurants and bakeries, but never would compare them to the light, fluffy type that I make. But the requests for using my recipe with pumpkin added was something I felt I needed to answer. Using suggestions I have received from others and with a few other changes, I was able to incorporate pumpkin into my family recipe while retaining the consistency, flavor, and texture of the original. I think the following recipe I have developed meets that standard.

For those that are not familiar with my original fluffy cheesecake recipe, give it a look – it offers a printable recipe plus a video on preparation. Also, be sure to read the Helpful Suggestions posted at the end of the recipe for help in baking the perfect cheesecake.

Ingredients:

Have all ingredients at room temperature.

Crust:

  • 9” springform pan
  • 1 ¼ cups graham cracker crumbs
  • ¼ cup melted butter
  • 2 TBS. granulated sugar

Directions:

Preheat oven to 320 degrees

In springform pan, with fork stir graham cracker crumbs with melted butter and sugar until blended and moistened. With hand, press mixture onto bottom of pan. Set aside.

Pumpkin Cheesecake Crust

Filling:

  • 2 packages (8 ounces each) cream cheese – softened
  • ¼ cup milk
  • 1 can (15 oz.) pumpkin (not pumpkin-pie mix)-preferably Libby’s
  • ½ cup sour cream
  • 6 eggs separated (whites in mixing bowl, set aside)
  • 1 cup sugar
  • ¼ cup light or dark brown sugar
  • 1 ½ tsp. pumpkin pie spice
  • 1 TBS. pure vanilla extract
  1. In large bowl, with mixer at medium speed beat cream cheese with milk until smooth; slowly beat in sugar and brown sugar until blended, scraping bowl often with rubber spatula. Beat in pumpkin, sour cream, egg yolks, pumpkin pie spice and vanilla.Pumpkin Cheesecake Batter
  2. In separate bowl beat egg whites until stiff and stand in peaks. Carefully fold whites into mixture until well blended.
  3. Pour mixture into prepared crust and bake for 1 hr 10 minutes or until center barely jiggles.
    Pumpkin Cheesecake Springform Pan
  4. Turn off oven and let cheesecake sit for 1hr in oven. Do not open oven door!
  5. Remove cheesecake from oven and set on wire rack. With thin knife, loosen cheesecake from side of pan. Cool cheesecake completely.
    Pumpkin Cheesecake Baked
  6. Do not remove rim and cover with plastic wrap and refrigerate overnight.
  7. Remove side of pan to serve. Garnish with powdered sugar.

Happy Holidays to all! – Mary

Is Motherhood for You?

Child psychology was my major in college along with Early Childhood Education as my minor. However, I do not consider myself an expert in the field of psychology, but I had a strong desire to be a good teacher and a good mother. I enjoyed every minute of raising my two children, a boy and a girl. I read every recommended book on the best-seller list on raising children, child behavior from birth to teen years, and all the health information available on feeding and childhood illnesses. I did this reading prior to having children and felt I would be well prepared when my first child arrived and then would have that experience to help when my second child arrived.  Reading books on child rearing is one thing but the actual task is another!

Now, as a grandmother and senior citizen, I am seeing a change in how women and men approach parenthood. They are finding it more stressful than they originally thought.  Being generations away from new parents, I can see how their lack of knowledge prior to giving birth has left many a new parent doubting their ability to raise their child with as little stress as possible. Also, some who succumb to social pressure to be parents may tend to oversimplify the issues involved.  Crying babies, sleepless nights, poop in their diapers and fussy eaters is nothing new in what all babies have done for ages. This can be very frustrating to many a new parent. However, I would like to ask women contemplating motherhood some questions and give them some things to think about before they embark on this life changing journey:

  • Ask yourself if you enjoy children, especially infants now and when you were growing up.
  • Did you babysit when you were young? Did you enjoy those times or was it only the money that interested you?
  • When you were a child did you enjoy playing with dolls, playing house, and always playing the mother role?
  • Prior to getting pregnant and during your pregnancy are you reading all the literature on child bearing, care, and feeding?
  • Have you talked to other mothers to hear their everyday experiences in raising their children?
  • Is social pressure from friends, relatives, or co-workers on having a child affecting you?
  • Do you enjoy cooking, cleaning house, being organized, and planning your awake hours to the fullest?
  • Is your mate interested in having children? Will he be a help in parenting along side of you or would all the responsibility rest on your shoulders?
  • Did your mother do the entire child rearing when you were growing up or did your Father help? Are you pleased with how your parents raised you and would you emulate them?
  • Do you admire women who have children and work outside of the home? Do you think that is something you could easily do or do you see it as being a handicap to have a job and support a family?

These are just a few questions to ask yourself and to realize how much of your upbringing, your   knowledge of children, mainly babies, will play a big part in your enjoyment of starting your family. It’s not easy to raise a baby just as it was not easy to give birth, but once the baby arrives all the pain is forgotten. My prayer to a new mother is to be patient, loving, and to remember those days when it seems the baby would not stop crying, or not sleep throughout the night, or eat the healthy food you prepared for it.  They always outgrow it. I remember when I had my first child who would not give up his pacifier and it seemed like ages before he was potty trained and I anxiously mentioned this to our pediatrician and his answer was: “Believe me he will not be using a pacifier when he goes to kindergarten and rest assure he will not be carrying an attaché case and still not be potty trained”. In time, all things pass!

For expectant mothers and those contemplating motherhood, I have some tips I will pass on in my next post.  In the meantime, relax and enjoy this time to prepare.